You know that feeling when you’ve done the same ponytail so many times it starts to feel like a uniform? It’s time to break the cycle. You don’t need a salon appointment to look polished. In fact, some of the best hairstyles are the ones you can throw together in five minutes before the doorbell rings.
Here is the lowdown on two top knot variations that bridge the gap between “I tried” and “I looked like I hired a stylist.” One is for putting your best face forward. The other is for when you just want to exist.
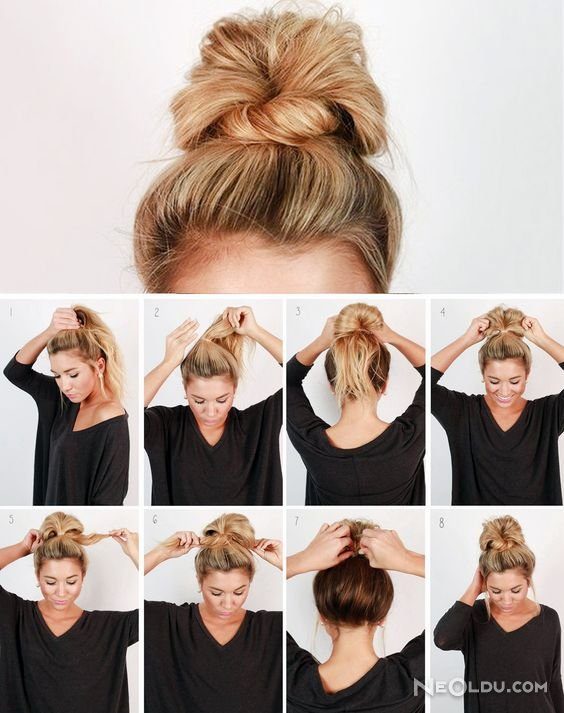
How to Master the Messy Bun for a Polished Look
The messy bun isn’t just a lazy choice anymore. It is a deliberate aesthetic. In 2024, pairing a relaxed top knot with simple clothing is a major trend. It reads as effortless but expensive.
The secret? Intentional chaos.
Unlike a tight, severe updo, this style relies on volume and loose strands. To pull it off, you generally need hair that hits at least past your shoulders. Anything shorter tends to slip out of the elastic too quickly.
The Step-by-Step Guide to the Perfect Messy Knot
Making a messy bun at home is surprisingly mechanical if you follow the structure.
- The Base: Gather your hair at the nape of your neck. Don’t smooth it down perfectly. Leave some texture.
- The Split: Divide the ponytail into two equal sections.
- The Knot: Tie these two sections together in a simple knot. This is the trick to getting that rounded, “bombé” shape without needing a donut tool.
- The Expansion: Gently tug on the knot to widen it. The more you pull, the fuller the bun looks.
- The Secure: Wrap the remaining ends around the base and secure with bobby pins. Tuck the tips inside so they don’t stick out awkwardly.
This look works for brunch, office days, or a sudden dinner plan. It says you care about your appearance but not enough to stress over every strand.
The “Real Life” Home Bun: Why It’s Actually Chic
Let’s talk about the bun you wear when the world feels heavy. The “home bun” (or what some jokingly call the “depression bun”) has a reputation for being purely functional. You pull it up after wiping off makeup, slipping into pajamas, and finally collapsing onto the couch.
It’s practical. It’s comfortable. It keeps hair off your neck during cleaning chores.
But here is the shift in perspective: this style has become a cultural symbol of authenticity.
Women have always mastered the art of the quick updo, and salons are arguably jealous of how naturally women execute this look. It isn’t just about hiding hair. It’s a uniform of self-care and rest.
“The home bun is no longer just for inside the house. It has become a statement of sexy, casual confidence.”
Strangely, many men find this look more attractive than a fully styled blowout. It signals approachability. It signals that you are comfortable in your own skin. Because of this, women are starting to wear the home bun outside. Not as a slovenly mistake, but as a deliberate choice to look relaxed and approachable.
It turns out, there is power in looking like you just woke up and decided to look good anyway.
How to Master the Practical Half Bun for Any Occasion
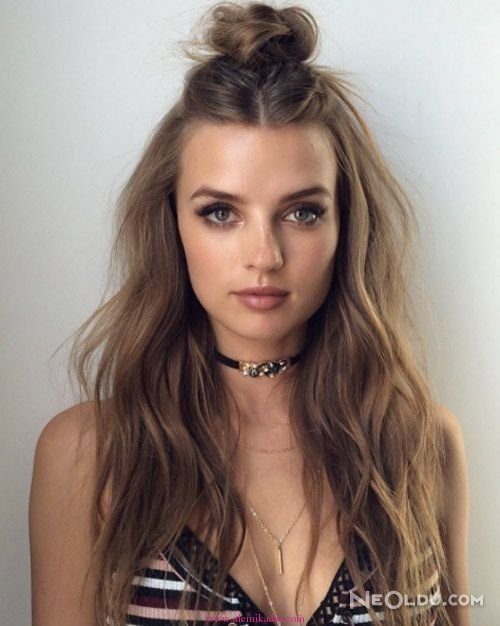
The half-up bun has been the go-to style for women who prioritize comfort without sacrificing polish. It became a defining look for the spring-summer season of 2015 and has maintained its relevance because it works for women of all ages. The appeal lies in the balance it strikes: you get the relaxed, sporty vibe of a ponytail with the elevated elegance of an updo.
Here is why this style dominates modern hair trends.
Why the Half Up Bun Works
The shift toward “cool” and comfortable aesthetics has changed how we style our hair. Women are moving away from tight, restrictive styles that feel like work. Instead, they want options that transition easily from daytime errands to evening outings. The half bun delivers exactly that. It keeps hair off your face and neck while leaving the rest of your mane free to move.
You do not need straight or wavy hair to pull this off. Whether your hair is naturally curly, textured, or pin-straight, this method adapts to your natural texture. The key is simplicity.
Step-by-Step Guide to the Perfect Half Bun
This is not a complex technique. You do not need a professional stylist or hours of prep time. Just a single hair tie is sufficient.
- Section Your Hair : Gather the top half of your hair, starting from just above your ears and going up to the crown of your head.
- Twist for Volume : Instead of a flat ponytail, give the gathered section a slight twist before pulling it back. This adds texture and prevents the style from looking too rigid.
- Secure the Base : Hold the base of the ponytail firmly. Wrap the hair tie around it twice to ensure it stays in place without slipping.
- Create the Bun : Take the loose ends of the ponytail and wrap them around the base of the hair tie. If the hair is long, tuck the ends under the base. For shorter hair or a messier look, you can leave the ends exposed or use a second small elastic to secure the loop.
- Adjust and Pull : Gently tug at the sides of the bun to loosen it slightly. This creates volume and a softer, more intentional look.
Where to Wear This Style
The versatility of this cut is its greatest strength. You can wear it during the day for a casual coffee run or a work meeting. It looks polished enough for the office but casual enough for a weekend brunch. As evening approaches, the style transitions effortlessly. It pairs well with casual dresses for a night out or jeans and a tee for a relaxed dinner.
Maintaining the Look
Because this style relies on ease, it is forgiving. If the bun slumps, you can adjust it with your hands. The “half-up” nature means less tension on your scalp compared to a full updo, making it comfortable for all-day wear. It is a practical choice for women who want to look put-together without spending twenty minutes on their hair.
The trend shows no signs of slowing down. It is a staple because it respects the modern woman’s need for both style and comfort.
The Half-Up Bun: A Quick Fix for Busy Days
It starts with two simple strands. Pull them from the front. Tie them back just like a low ponytail. Leave the rest flowing loose.
That is it.
You have the half up bun. It is effortless. It takes ten seconds. But don’t let the simplicity fool you. This style is deceptively chic. It keeps hair out of your face without the commitment of a full updo.
The Rise of Normcore Hairstyles
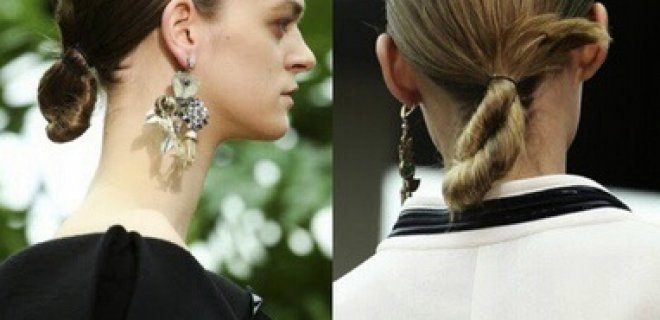
If you missed the memo, normcore is not leaving anytime soon. It is the aesthetic for women who want to look polished without trying too hard. Think of it as the normcore bun for your hair.
It looks like a low bun at the nape of the neck, but it feels completely natural. Why is it trending? Because it works everywhere.
Where to Wear the Normcore Look
This style is a chameleon. It fits into your schedule without demanding extra time.
- The Office: Look professional.
- The Gym: Stay secure.
- Date Night: Keep it relaxed.
The appeal lies in the flexibility. You can brush your hair back tightly for a sleek, minimalist vibe. Or you can pull it all up and leave a few pieces out for that “I just woke up like this” effect.
How to Style Your Normcore Bun
There is no single right way. But here is how you make it work for your hair type.
- The Sleek Version: Brush everything back. Secure it low at the nape. Pull it tight.
- The Messy Version: Gather the hair loosely. Twist it into a bun. Pull out strands around the hairline.
“Normcore is about comfort meeting style. It is not about perfection.”
If you have baby hairs or short layers around your hairline, do not fight them. Let them frame your face. In fact, you can use a little gel or edge control to lay them flat if you want a cleaner look, or let them fly free for texture.
The goal is ease. The result is modern.
The Bowknot Bun: A Nod to Minnie Mouse
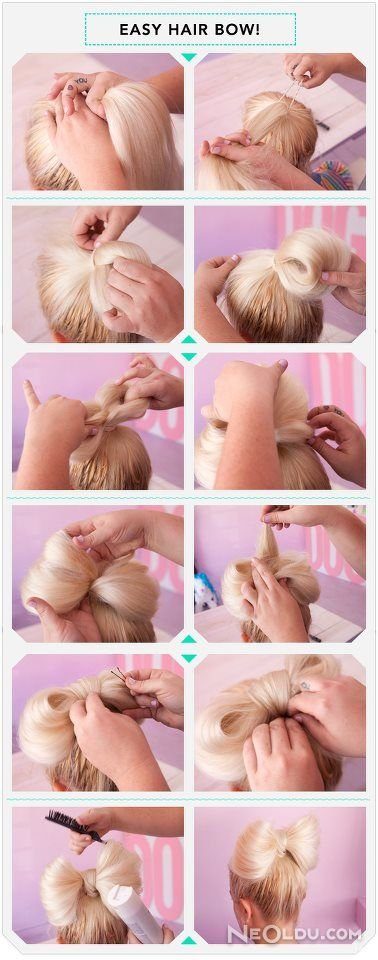
The bowknot bun is essentially a modern take on the “Minnie Mouse” hairstyle. It’s not about wearing a giant satin accessory in your hair anymore. Instead, you sculpt the bow directly from your own strands.
This technique creates a look that feels both playful and polished.
It’s one of the more elegant updos you can pull off. The versatility is high. You can place it at the crown for that classic Minnie vibe. Or you can experiment with lower placements for a softer effect.
Why It Works for Any Occasion
Most people gravitate toward the version where the hair is gathered at the top of the head. The hair is then twisted and pinned into a bow shape.
It strikes a balance.
It is sweet. It is chic. But it isn’t overly formal in a stiff way.
You can wear this to a daytime brunch. It looks effortless. You can also take it to an evening gala. The structured bow adds a touch of sophistication that fits a dressy crowd.
How to Achieve the Look Without Clips
The shift away from accessories means the hair itself does the heavy lifting.
Here is the general approach:
- Start with smooth, detangled hair.
- Gather your hair at the desired height.
- Create a ponytail, but do not pull the final loop completely through if you want a base for the bow.
- Split the ponytail into two sections.
- Loop them to form the bow shape.
- Secure tightly with bobby pins hidden within the folds.
The result is a seamless integration. The “bow” isn’t added on. It is built in.
This makes the style durable. It stays put through wind and movement. It also looks intentional.
There is something satisfying about turning your own hair into a decorative element. It feels creative. It feels personal.
You might find yourself experimenting with tightness. Or texture. A little teasing at the base adds volume. That changes the whole silhouette.
Keep practicing the pinning technique. It takes a steady hand. Once you get the hang of it, though, it becomes second nature.
The look is timeless. But the method is entirely yours to customize.
Fiyonk Topuz Yapımı
Start with a brush. Gather the hair at the crown. Use a hair tie to secure it. Pull it tight, like a ponytail. Do not pull the hair all the way through the last time. Leave the tips sticking up on top of your head. Split the gathered section in two. Take the loose ends and thread them through the middle. Flip them backward. Pin it down with a claw clip. Done. The bow bun is ready. It is quick. It is tidy.
The Donut Bun: A Balerin Staple
The donut bun has another name. It is called the balerin bun. Fashion cycles are long. This model does not fade. Women love it. It works anywhere. Day or night. Office or gym. You can wear it while lifting weights. It used to be for special nights only. Now it is daily wear. You have choices. Use a foam donut. It adds volume. Skip the tool if you want lightness. You can still make it work. No sponge needed. Just technique.
“The donut bun is versatile enough for the office and the gym.”
Which method suits you better? The structured donut or the simple twist? There is no wrong answer. Just different textures. Different days. You decide.
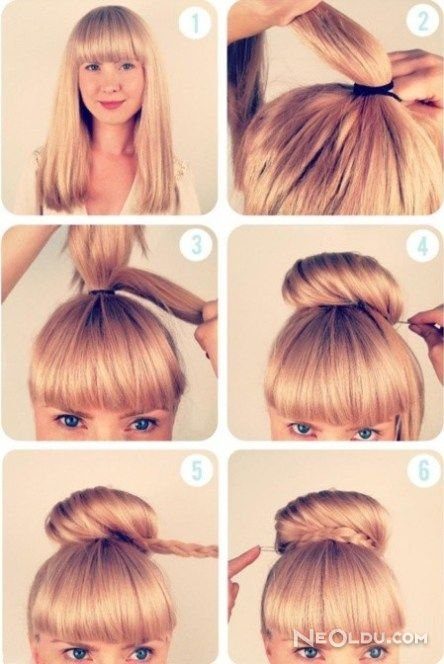
The Donut Bun: Your New Go-To Style
Forget complicated tutorials. Grab a comb, pull your hair back into a high ponytail, and secure it with a standard elastic. Here is the secret: slide a hair donut bun maker over that elastic band.
Wrap your ponytail around the foam ring. Spread the hair evenly so no gaps show. Secure the ends with bobby pins. You can choose a larger or smaller donut depending on how big you want the bun to be. It takes ten minutes. You look polished. You are ready for whatever happens next, whether that is a morning meeting or a dinner date.
Why the Braided Bun Is Trending Again
Braids used to be strictly for school mornings. Now? They are everywhere.
The braid bun has evolved. It is no longer just a practical style for kids. Women are choosing intricate, braided updos for nights out and casual weekends alike. Why the shift? Because it adds texture. A smooth bun is nice, but a braided bun has depth. It looks intentional.
You have options. The most popular method starts with braiding the sides before gathering them at the nape of your neck. But you aren’t stuck with just one look. You can braid from the crown, mix in Dutch braids, or keep it simple. The key is that the braid becomes part of the structure of the bun itself. It holds better, too. If you have thin hair, a braid gives it body before you even twist it up.
Think about your face shape. A side braid leading into a low bun softens angular features. A high, tight braid bun keeps things sharp and modern. There is no single right way to do this. Just pick the style that matches your mood and your hair type.
“The braid bun is no longer just a childhood staple. It is a sophisticated, textured alternative to the sleek ponytail.”
Start with dry, slightly dirty hair. It grips better. If your hair is freshly washed, add some dry shampoo or texture spray. Work the braid slowly. Don’t rush it. When you twist the braid into a bun, pin it securely. You want it to hold through the day.
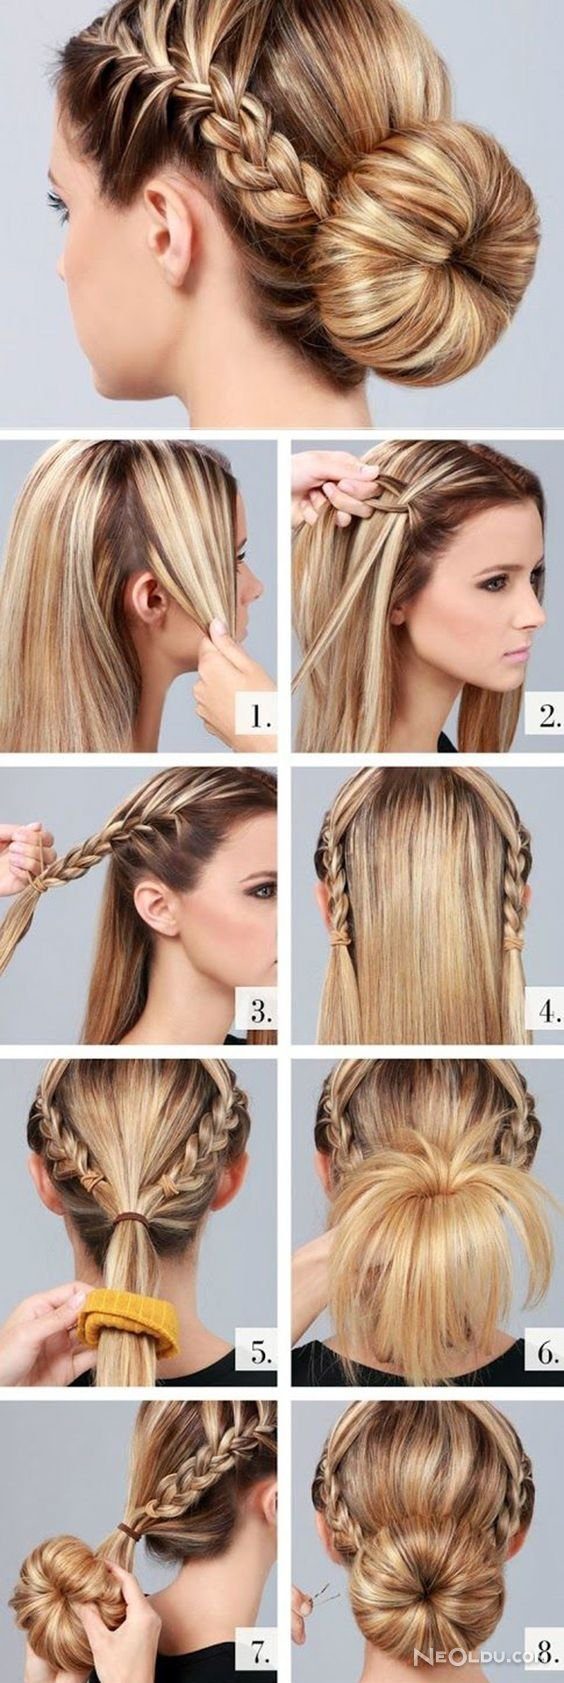
Start with your hair divided down the middle. Take one side and braid it all the way to the ends. Secure it with a thin elastic.
Do the same with the other side.
Gather both braids at the nape of your neck. Twist them into a bun shape. Pin it in place with a bobby pin. The braided bun is done. You can swap out the classic three-strand braid for a French or Dutch variation if you want more texture.
Why Hair Band Buns Are a Staple
Accessories change everything. A simple bun is fine. A bun with a scarf or headband? That’s style.
Hair band buns are popular for a reason. They work for almost any occasion. You can wear them to the office. You can wear them to a wedding. The versatility is unmatched.
Pick a band that matches your outfit. Or contrast it. Bold colors stand out. Pastels soften the look.
Which Headbands Work Best?
Not all headbands are created equal. Some slip out of place. Others dig into your scalp. You want something with grip but comfort.
Fabric-wrapped bands are gentle on hair. They don’t pull. Velvet adds a touch of luxury. Silk blends reduce friction, which helps prevent breakage.
For a more dramatic effect, look for embellished options. Bands with rhinestones. Bands with pearl accents. These add instant polish to an otherwise basic updo.
How to Make It Last
Hair accessories fail when the base is loose. A smooth bun holds better than a messy one. Tease the hair slightly at the crown for volume before twisting. This gives the band something to grip.
Spray a light hold hairspray before you start. Mist it again after you pin everything. You don’t need stiffness. You need stay-put power.
Where to Find Unique Bands
You don’t need to spend a fortune. Local boutiques often carry handmade fabric strips. They’re soft and unique. Online marketplaces offer thousands of designs, from minimalist silk ribbons to statement pieces with gemstones.
The key is finding what fits your personal aesthetic. A woman who loves vintage styles might prefer lace-trimmed bands. Someone with a modern edge might go for wide, solid-color elastic bands.
It’s about the detail. The way light catches a pearl. The color contrast against dark hair. Small choices make big differences.
Why stick to one look? Swap the band every day. Mix patterns. Try a bow knot at the back. Let your hair be a canvas.
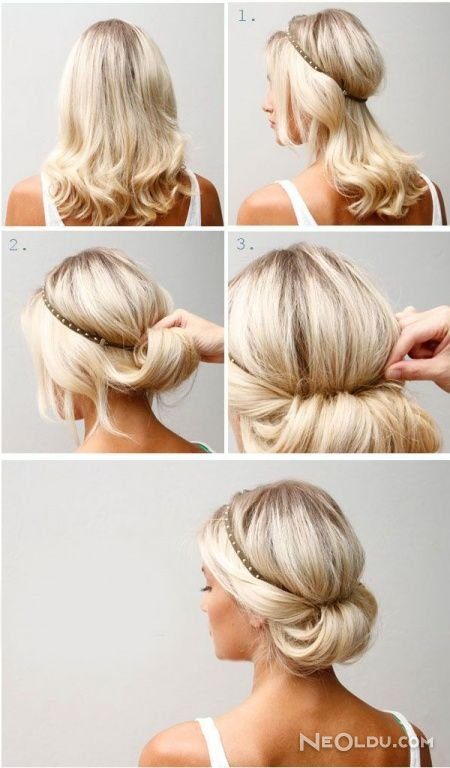
How to Make a Headband Bun and a Messy Bun in Minutes
You can go straight and sleek or keep it wavy. For the first look, you just need a hairband and a few bobby pins. Part your hair however you like at the front and shape it. Slide the headband on. Starting from the front, pull strands under the band to secure them. Keep going like that. Thread all your hair through the band in order. Secure the ends with pins. It is simple. It is practical.
The 5-Minute Effortless Bun
This works for daily life. It looks chic but sporty. Do not spend ten minutes on it. Split your hair down the middle. Tie a loose knot without pulling tight. Gather the leftover pieces. Pin them in place. You are done.
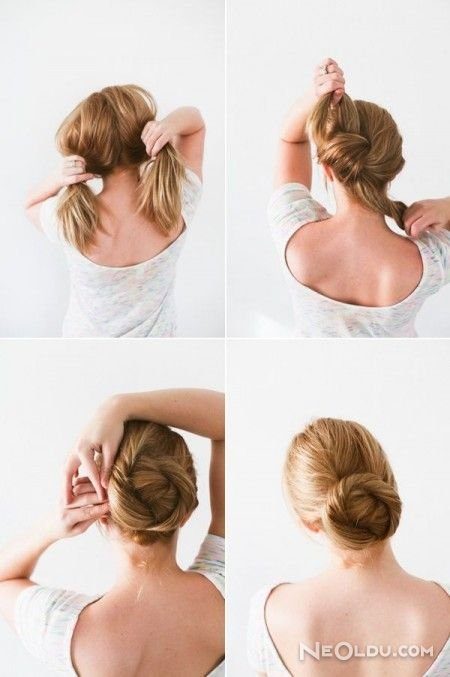
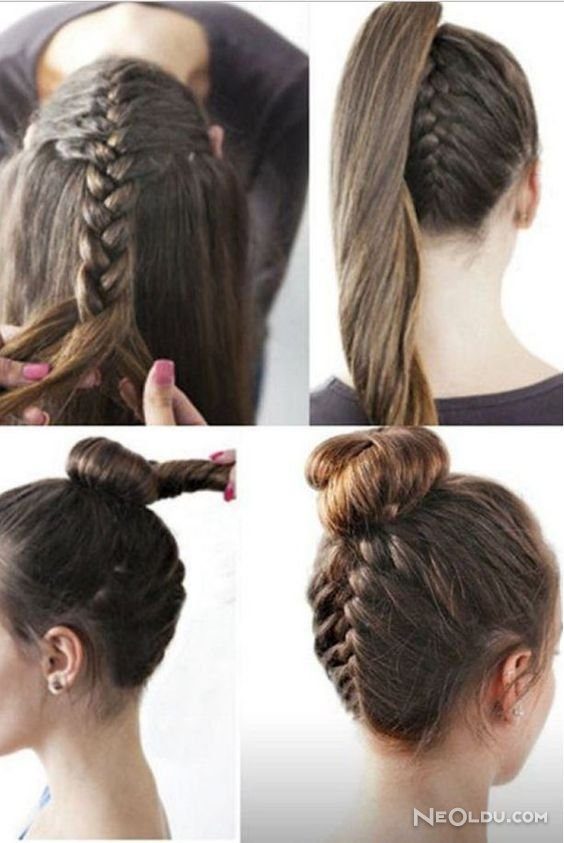
The Braided Baler Bun
Want a hairstyle that sits somewhere between understated and eye-catching? This look delivers exactly that. It’s not messy. It’s not chaotic. It’s cool.
Start by tilting your head forward. Grab the hair at the nape of your neck. Braid it tightly. The tighter, the better. You want structure. You want the braid to hold its shape against gravity later on.
Once the braid is done, pull everything into a high, tight ponytail. No loose strands. No slipping. Secure it firmly.
Now for the twist. Wrap the braid around the base of the ponytail. Coil it into a bun. Use bobby pins to lock it in place against your head. Tuck in any loose ends.
It’s done. You’re ready for the night.
The Knot Dilemma: Why Keratin Matters for Long Hair
If you’re rocking long locks, you know the struggle. Tangles aren’t just annoying; they signal fragility. Your hair needs resilience. Enter keratin. It’s not magic. It’s the protein that gives your strands their structure.
For women with longer hair, this isn’t just a buzzword. It’s a survival tool. You need elasticity to withstand brushing, styling, and the general wear of daily life. Without it, snapage becomes inevitable.
What Is Keratin and Why Should You Care?
I mentioned earlier that keratin is essential for strengthening hair. But what exactly is it doing inside your follicle?
Keratin is a fibrous structural protein. It’s the same stuff that makes up your nails and the outer layer of your skin. In your hair, it acts as the glue holding the cuticle scales together. When that bond weakens, moisture escapes. Frizz creeps in. Breakage takes over.
If you’re starting from zero on this topic, you might be wondering about the basics. Check out our guide on what keratin is and its benefits to get the full picture. It covers the science without the jargon.
Strengthening the Bond
The goal here isn’t just shiny hair. It’s functional hair. You want strands that bend instead of breaking. Keratin treatments help replenish what daily styling strips away.
- Elasticity returns. Your hair stretches and snaps back.
- Porosity drops. Moisture stays locked inside longer.
- Frizz loses its grip. The cuticle lays flat.
This matters most for those of us with hair past our shoulders. The older the ends, the weaker the bond. It’s basic physics.